
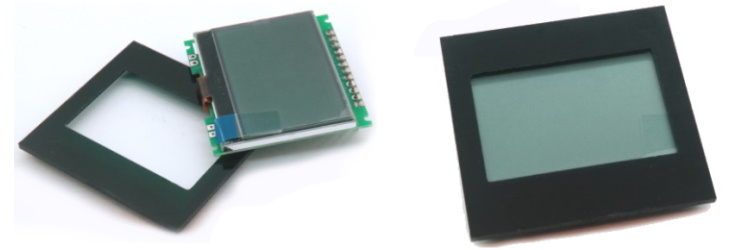
The LCD 128×64 COG Display is a little different from most other displays. Other displays separate the actual ‘glass’ of the display and their driver chip (which is usually mounted on the rear PCB).
These COG displays (which stands for “Chip On Glass”) have their driver chip incorporated in the glass part of the display. In many cases, COG displays do not have a separate rear PCB – presenting their connections with, for example, DIP style connections. Oddly, we have found that COG displays tend to be more expensive.
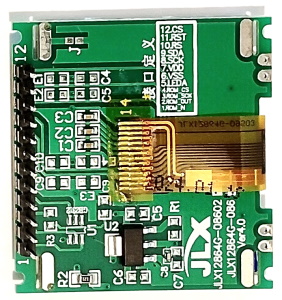
Our LCD 128×64 COG Display does, however, have a rear PCB but that only holds a power regulator and a few passives. There is also provision for a character ROM (usually for Chinese characters), but our display does not include that ROM. In fact the PCB does little more than converting the display’s ribbon cable into a 2.54mm/100MIL header, and to provide a hobbyist-friendly way for physical mounting (which we do in a custom-made bezel).
We supply a 5V version of the display (having a 3.3V regulator), but there are 3.3V versions available that do not have the regulator. For either type though, you have to use 3.3V signals.
Connection and board details
The rear of the board has:
- 12 pins on a 2.54mm/100MIL spacing. The silk screen shows the connection details for each of the 12 pins. Note the pins 1,2,3,4 are for a Chinese Character ROM (U1) that is not included, so you can ignore these four connections.
- In position U2, there is 1117 5V to 3,3V regulator, being a common 1117 type. The 3.3V variant (we do not supply that) does not have this regulator and links at position R1.
- The 2 pairs of 2 PCB holes on the lower edge have no electronic purpose as far as we can work out, but may be useful for mechanically mounting the display elsewhere.
- Note that Pin5 (marked LEDA) is the backlight. According to the manufacturer’s schematic, there is a series resistor onboard, so you need to supply power to this pin. We have been using this display with 3.3V on pin5 and is works fine. The data sheet does not state if it will tolerate 5V, so we assume it does not. i.e. up to 3.3V only.
You could, if you wish to dim the backlight, add a series resistor between Pin5 and 3.3V to reduce the current and thus the backlight intensity.
Interestingly, because this display is black on a white background – the display operates pretty well without the backlight, if you want to reduce current consumption. But it’s better with the backlight, in our view!
A note about power
The LCD 128×64 COG Display that we supply is the 5V variant. However, we have tried it on 3.3V and it does function. However, the 1117 regulator does reduce the LCDs supply voltage to 2.4V (from 3.3V) so we cannot say how reliably this will be or what damage might result. Hence, the use of 3.3V is not supported – by anyone.
Drivers
The display uses a UC1701X driver chip, which does not appear to us to be as widely supported as other common LCD drivers. For driving from Arduino, we use the SimpleUC1701.h library. We have found this library to be easy to use and solid. Credit to Peter Balch for his library. You should be able to get this display up and running pretty quickly, and there is a sample Arduino sketch in our downloads section.
Contrast
Unlike many other LCD displays (which use a variable resistor to adjust contrast), this display has no provision for an external contrast signal. Instead the contrast is adjusted in software by using 2 parameters:
- Voltage divider – SetResistor(3);
- Contrast setting – SetContrast(32);
The above values of 3 and 32 seem to provide a crisp display in our tests. Note, we found that you have to do SetResistor before SetContrast because, we think, it is SetContrast that loads both values.
If you see nothing on the display, then it’s likely that you have not correctly set these two setting.
We expect to see crisp black pixels on a white background. If you get the contrast settings wrong, the pixels can be too light at one end or too blue-ish at the other. These contrast settings are something you will need to test and adjust for your own preference. Because the display uses a white background, getting the contrast adjustment right is important.